
A Quick Step by Step Guide:
This is a common issue we see when first getting started and there is a thorough and systematic approach to resolve the issue. Always feel like you can call us with questions or if you would like us to walk you through it we are happy to help.
Key Steps
- Check the Flight Controller Orientation in Betaflight
- (Technique) Mark the Front and Back of the drone
- Check Prop Rotation Direction (Most Common)
- Reload CLI (Sometimes reloading the CLI or different version actually works)
- Change Motor Direction if needed (Last resort)
- Call us
You will need: Drone, MicroUSB cable, computer, radio, and fresh battery.
Steps
1. Betaflight Check - Flight Controller Orientation
Connect the drone to the computer via the MicroUSB cable, and power up Betaflight. Set the drone on a level surface and hit "Calibrate Accelerometer". This reminds the board what level looks like and improves stable flight. This naturally drifts over time so always a good idea to do a fresh reset when the drone is connected to Betaflight.
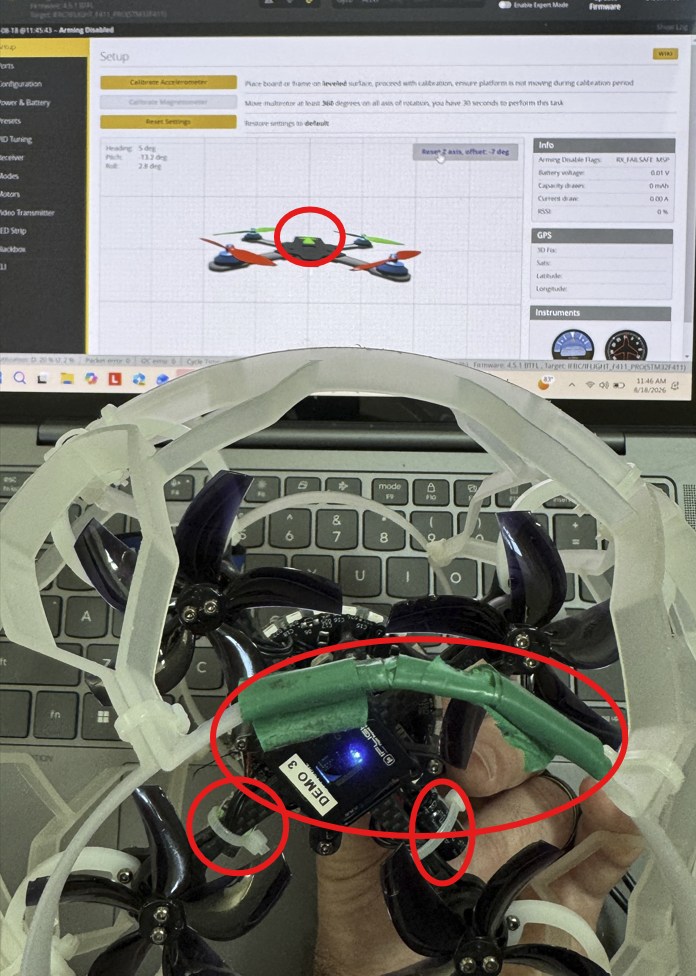
Next select "Reset Z axis, Offset, XXX deg" Tab (XXX is a moving number based on live drone). This resets the image.
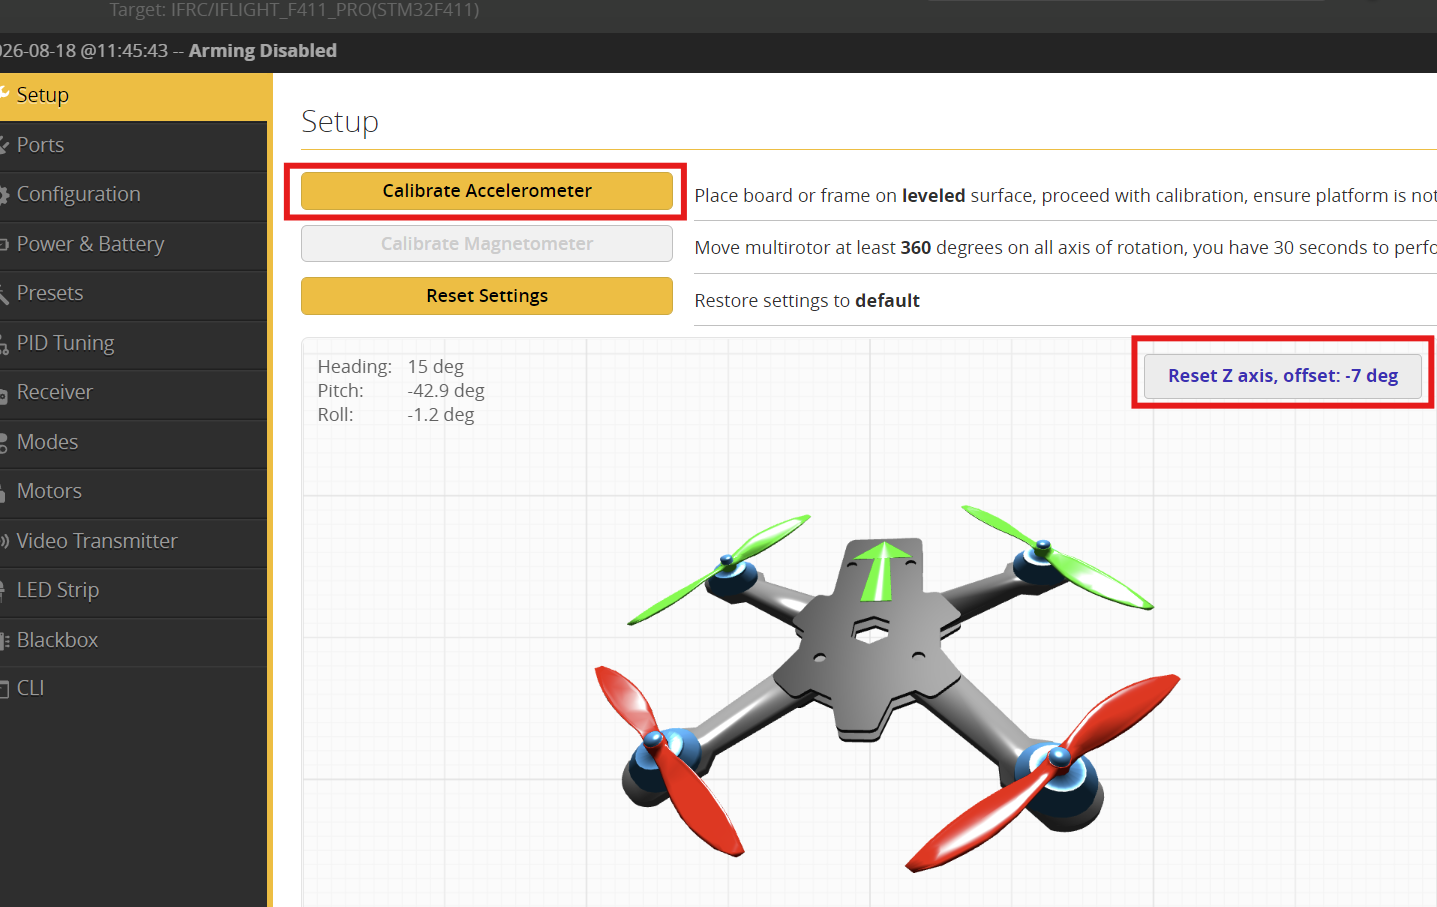
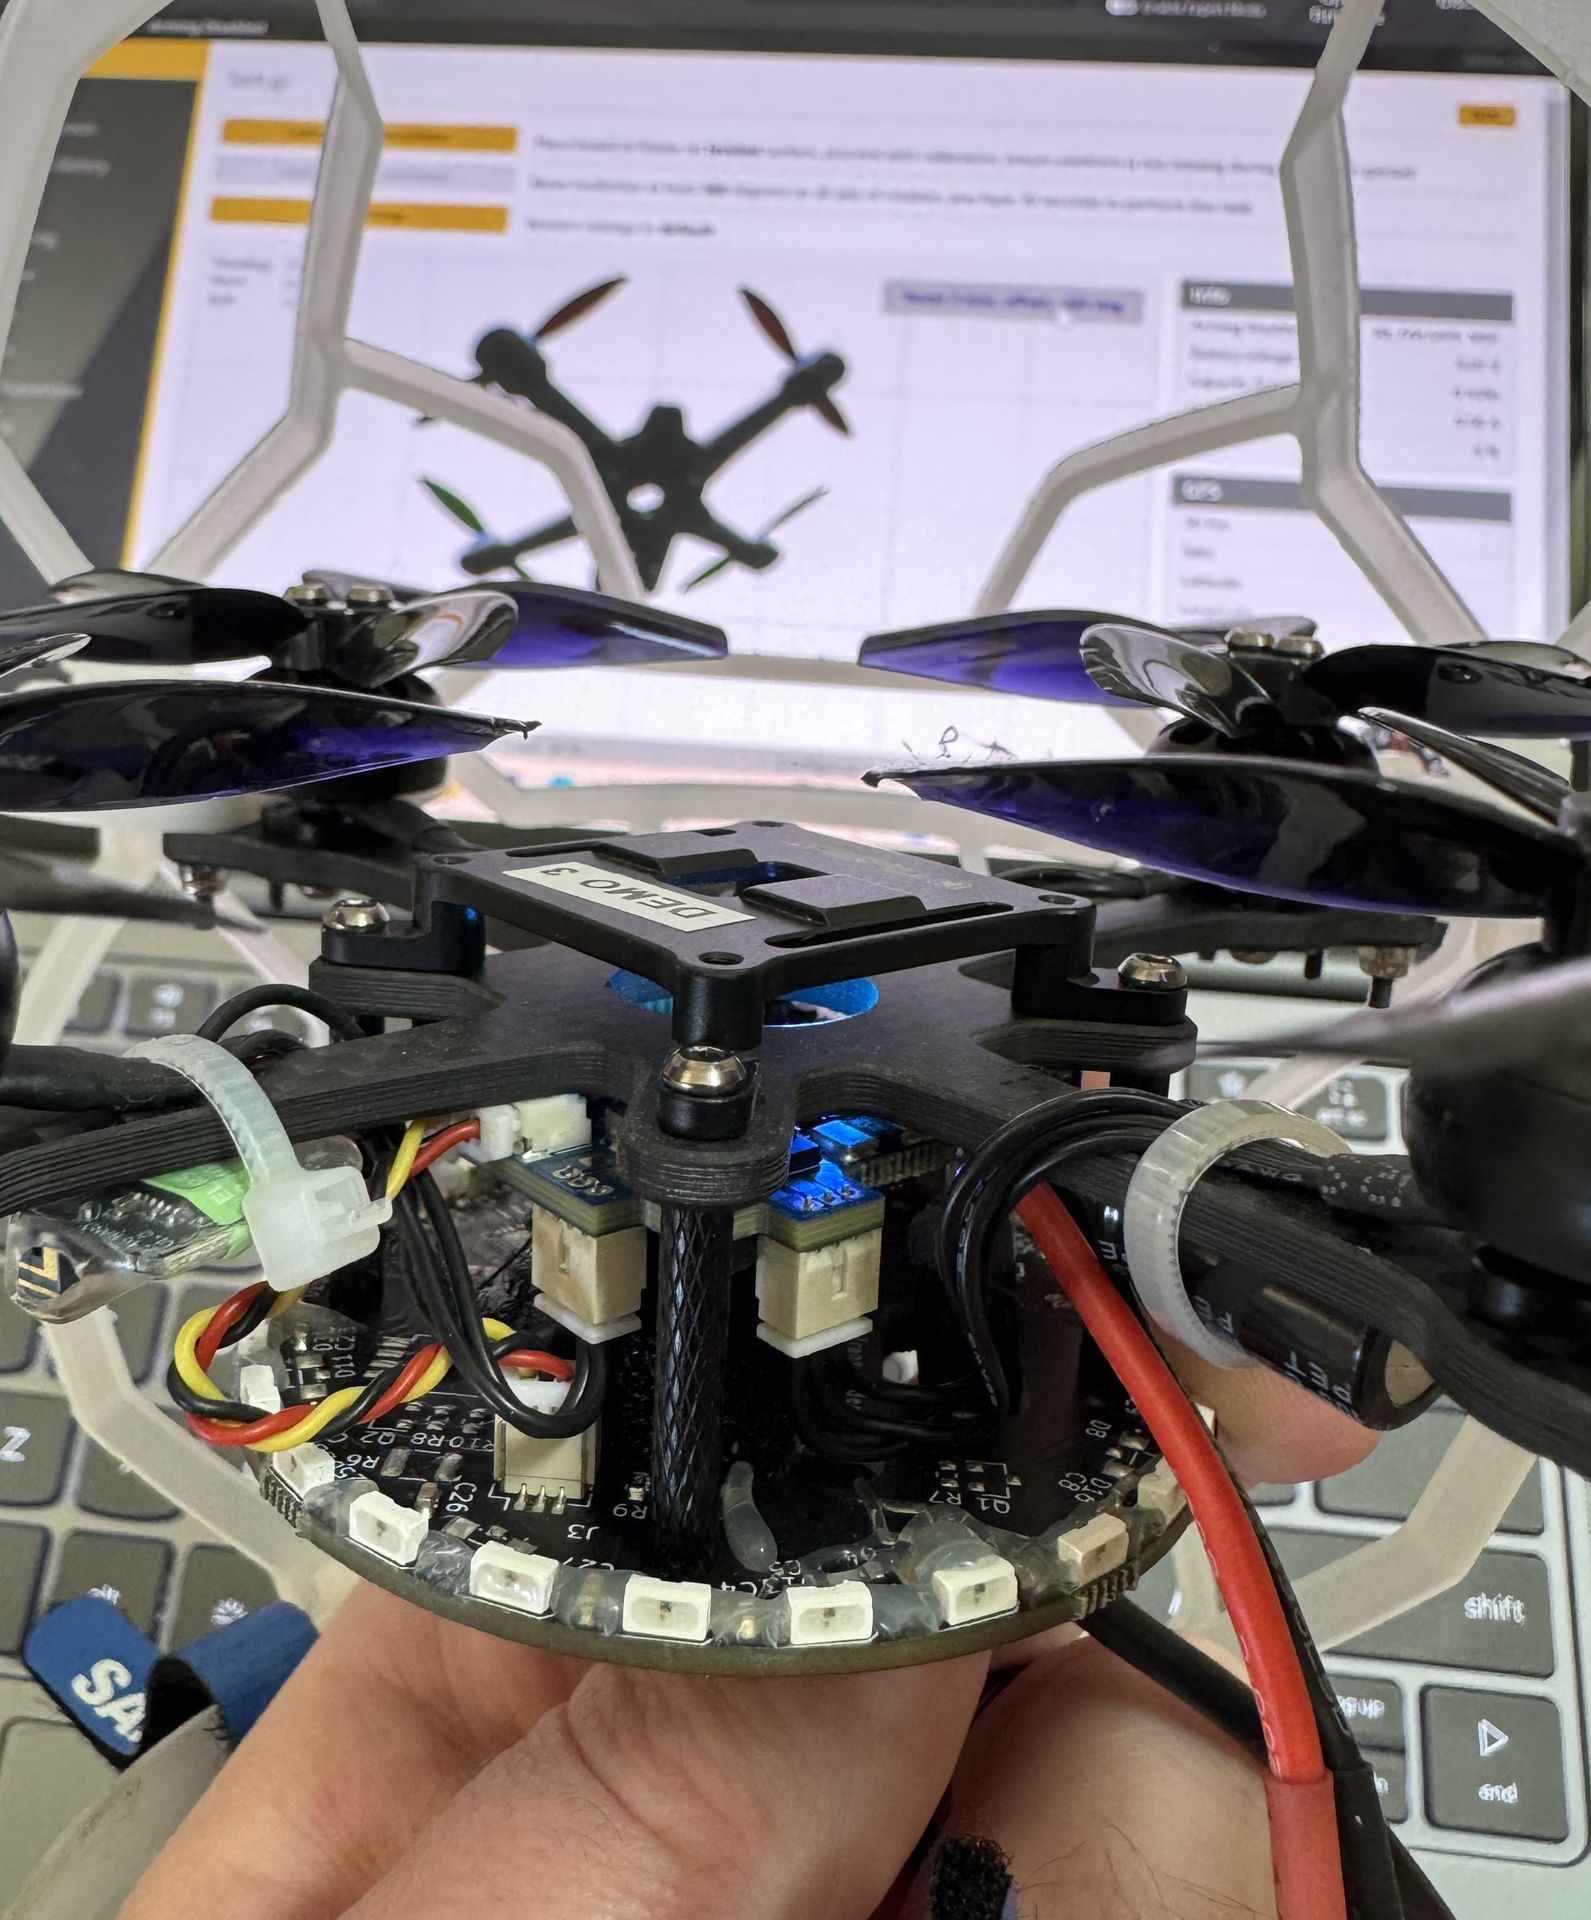
Look at the arrow on the drone in the image. This is where the Flight Controller thinks the front of the drone is. Tilt the drone in your hands. Does this arrow line up between two motors like pictured below?
If yes, proceed to the next step. If not, we will need to adjust the Flight Controllers Gyro in step 1.5.
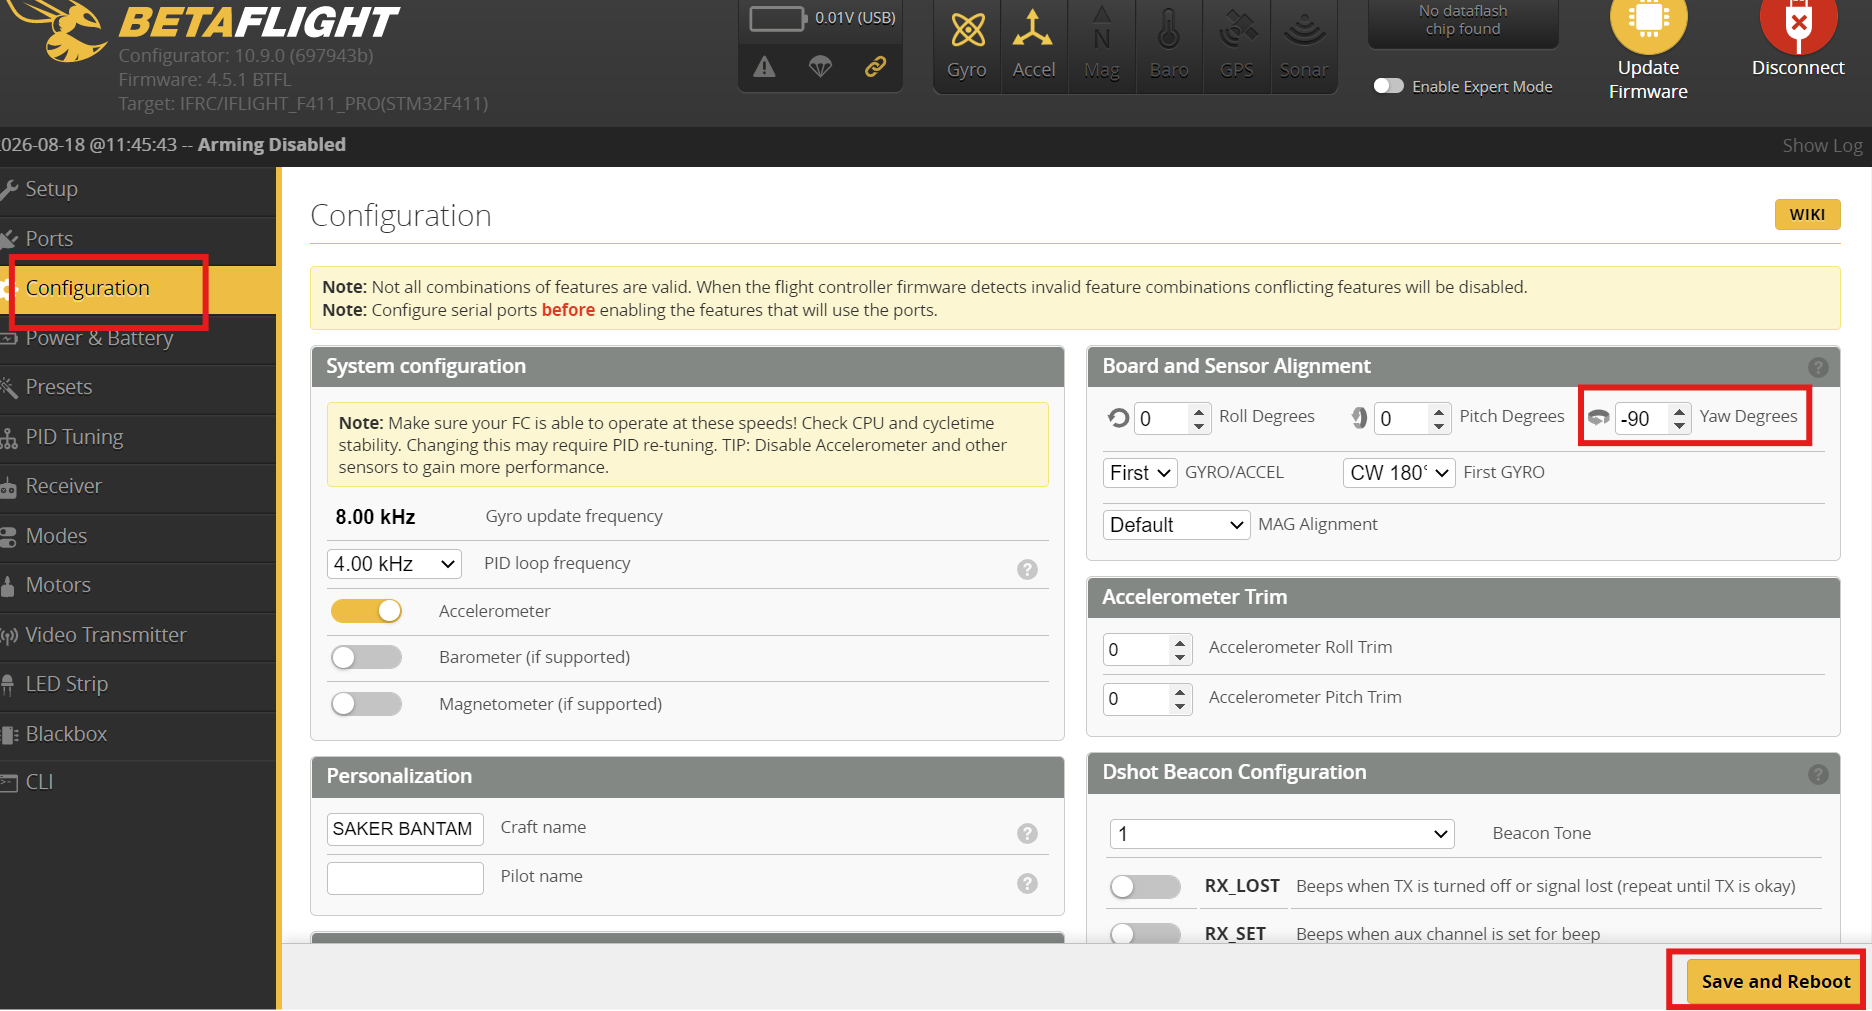
1.5 Adjusting the Flight Controller Orientation in Betaflight
Go to the "Configuration" tab on the left. On the right hand side of this page you will see "Yaw Degrees" and it will be set to "0". Go ahead and type in "90" or "- 90" degrees to adjust the board. Typing in a negative number "-" tells the board to rotate left. If a positive number, the board rotates to the right. For example, first type "-90", select "Save and Reboot" and go back to the "Setup" tab on the left side to check to see if the drone image now arrow aligns with the front of the drone. If not, go back to "Configuration" and increase the input by 90 degrees. For example type "-180" this time and check again. then "-270". Each time the board will rotate an additional 90 degrees.
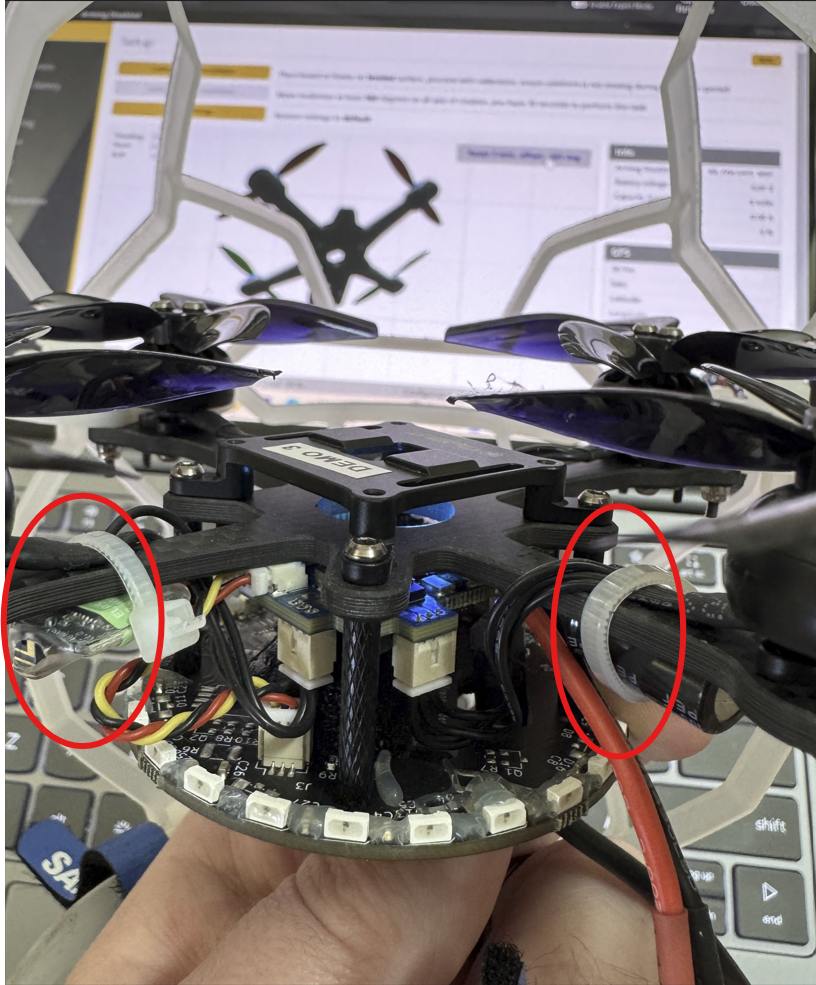
2. (Technique) Mark the Back and Front of the Drone.
One technique we suggest is to mark the back of the drone by zip tying the capacitor and receiver to the frame arms. I always know between the two zip ties I expect to see the Battery LEDs when I set the drone down and power it up. Another technique is to mark the front of the drone. This can be done via paint color or in this picture, tape. The problem with this method is if the cage is ever removed during travel or repairs, the tape needs to be correct during re-assembly.
As an added bonus, zip tying the capacitor and receiver you are preventing these components from getting cut by propellers or breaking from a hard crash. Other techniques are covered here to secure your drone and prevent damage.
3. Check if the Propeller Rotation is Correct
*Technique: With safety precautions met, safety glasses on, and hands outside the Exoskeleton, you can do a quick test to determine if there is a propeller going the wrong direction. Arm the drone and with propellers spinning, place your hand above the drone. Any airflow above the drone indicates a backwards propeller. If so, proceed below.
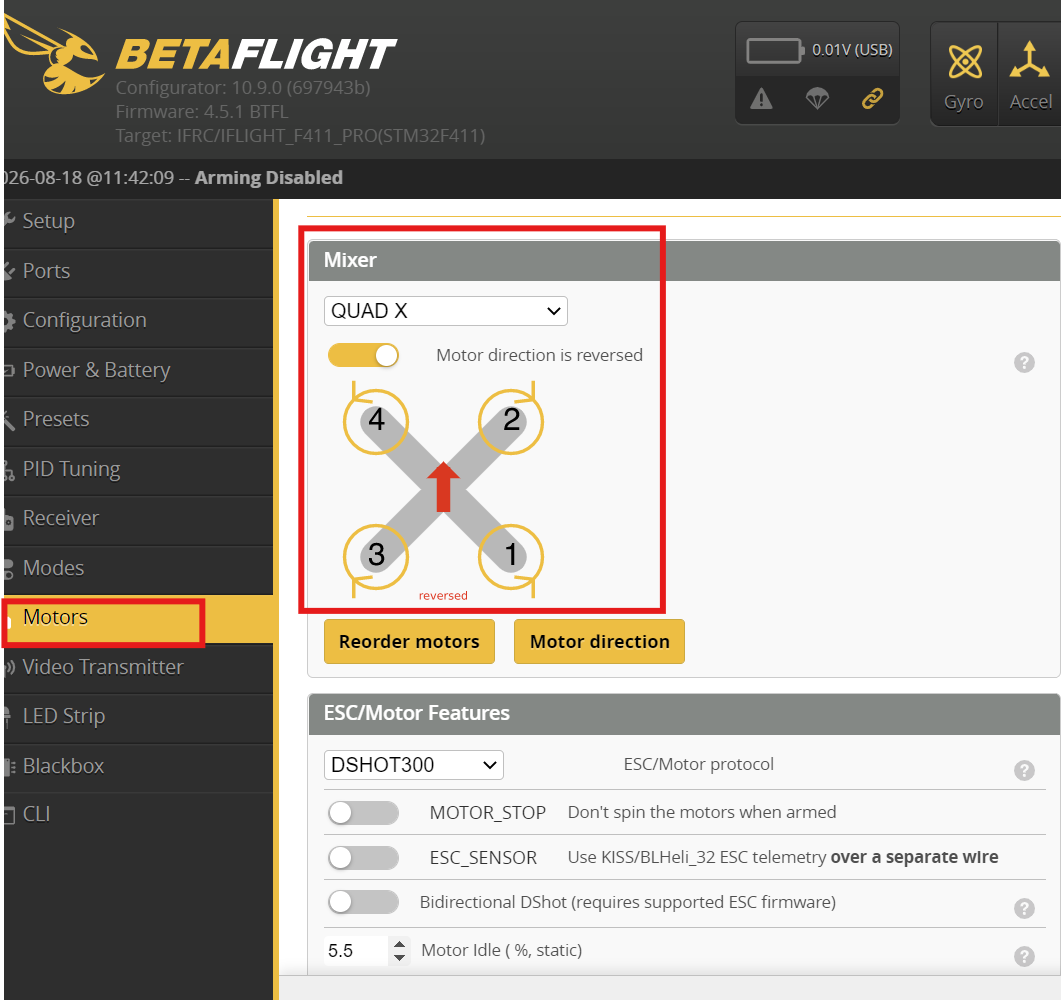
Go to the "Motor" tab on the left side in Betaflight. There will be a diagram depicting the direction of the drone propellers. Ensure the Propellers are set to spin in the direction depicted.
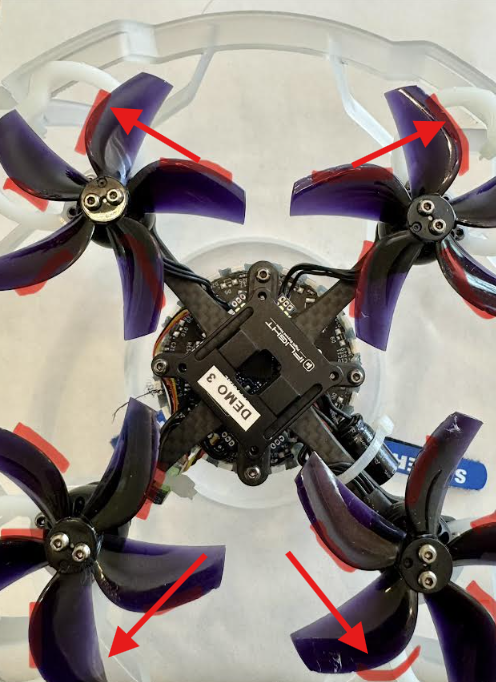
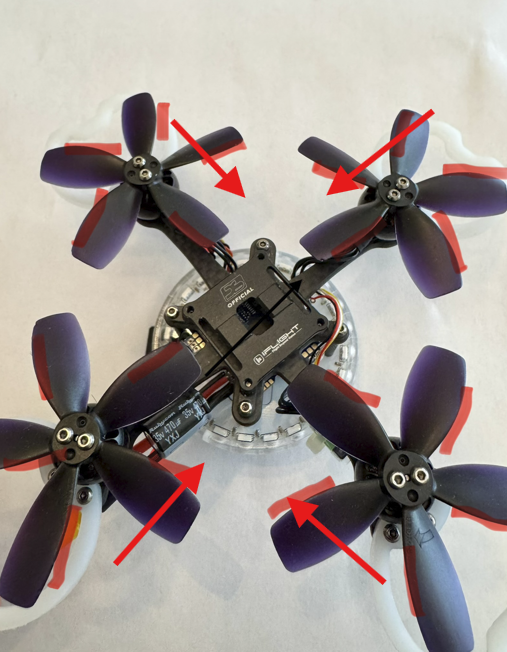
(Ensure the drone is oriented with the front pointed towards the screen. This way motor 2 and 4 are closest to the screen.) Expect to see the leading edges (Red highlight) like the image below. The arrows point in the direction of rotation. If this is not the case, swap propellers until they reflect what is pictured.
You will notice the "Motor Direction is Reversed" tab is selected in the image below. This particular format is known as "Props Out" configuration because they spin away from the center at the top and bottom. We recommend whatever the default is from the CLI setting upload and not to change it. Either works well but changing between the two could cause additional problems.
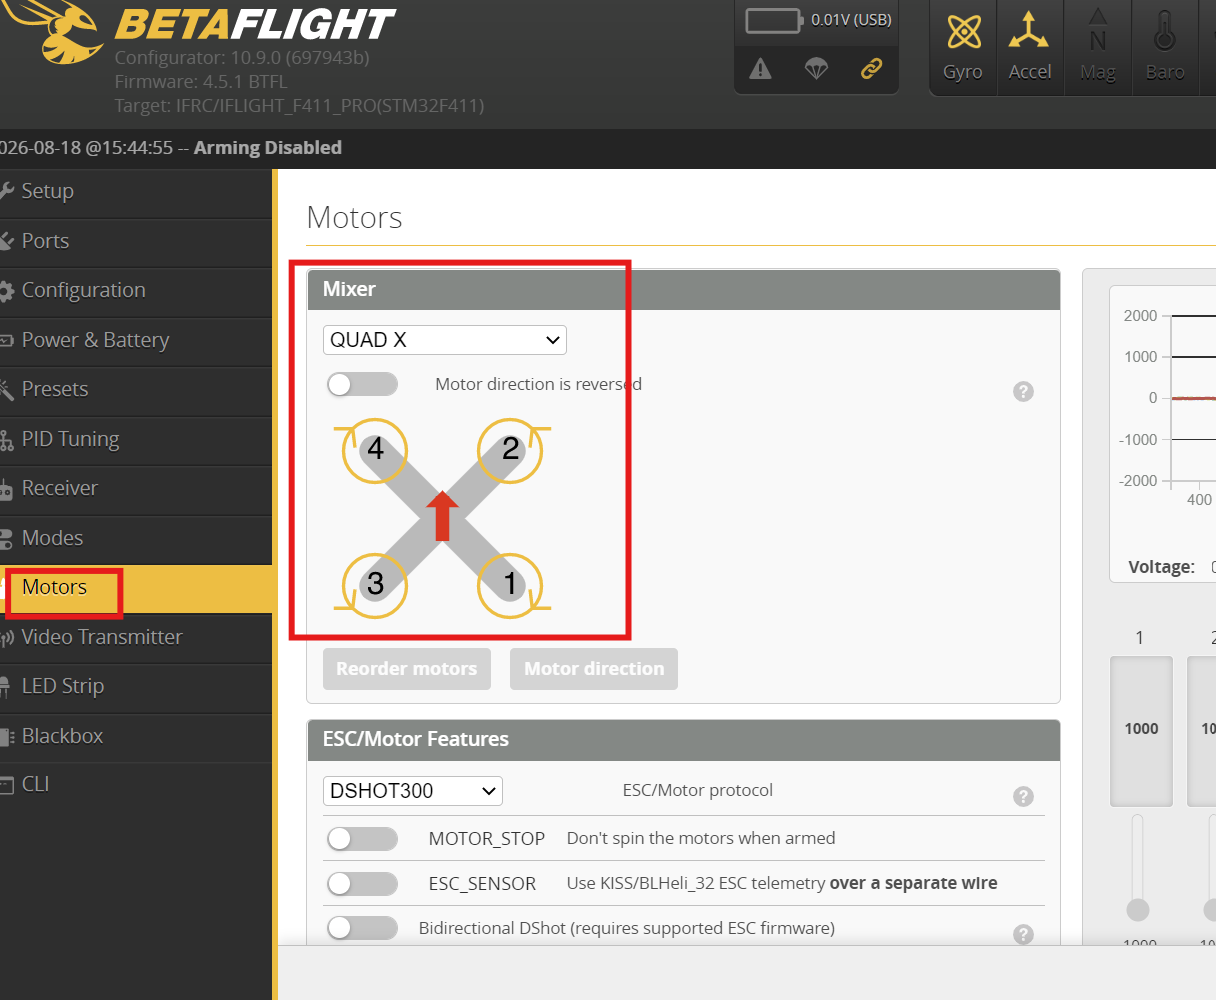
If the "Motor Direction is reversed" button is not selected as pictured below, then expect your propeller configuration to look like this. Also known as "Props In" configuration.
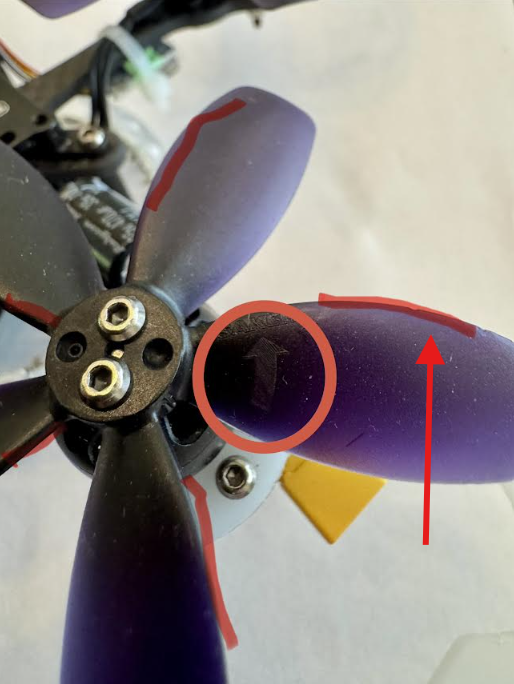
To assist with the leading edge identification and rotation identification, if you have the Saker Propellers - there is a Direction of Rotation Arrow. This particular propeller is designed to rotate counterclockwise.
3. Reload the CLI
If propellers are all oriented correctly. Try and reload the CLI you used first. If this does not resolve the problem when you try to fly, try to load a different firmware version. For example, If you loaded CLI 4.6, try and reload 4.5.1. Sometimes the Flight Controller doesn't receive the code well and it needs to be done again. Its a quick thing to try and sometimes needed to get the settings uploaded. We have seen this technique work more than once to resolve issues.
4. Changing Motor Direction - Last resort
This requires a keen eye to find which motor is spinning the wrong way. First we will check to make sure the Flight Controller knows what motor should be in what position. Then we will check individual motors for rotation.
*Technique: have an extra person with you to assist watching the propeller. It happens quick and its difficult to determine the rotation.
- Remove Propellers for safety and ensure hands stay outside the cage during testing
- Plug in a charged battery into the drone
- Connect the drone to the computer via MicroUSB and power up Betaflight
- Select the "Motor" tab on the left side in Betaflight
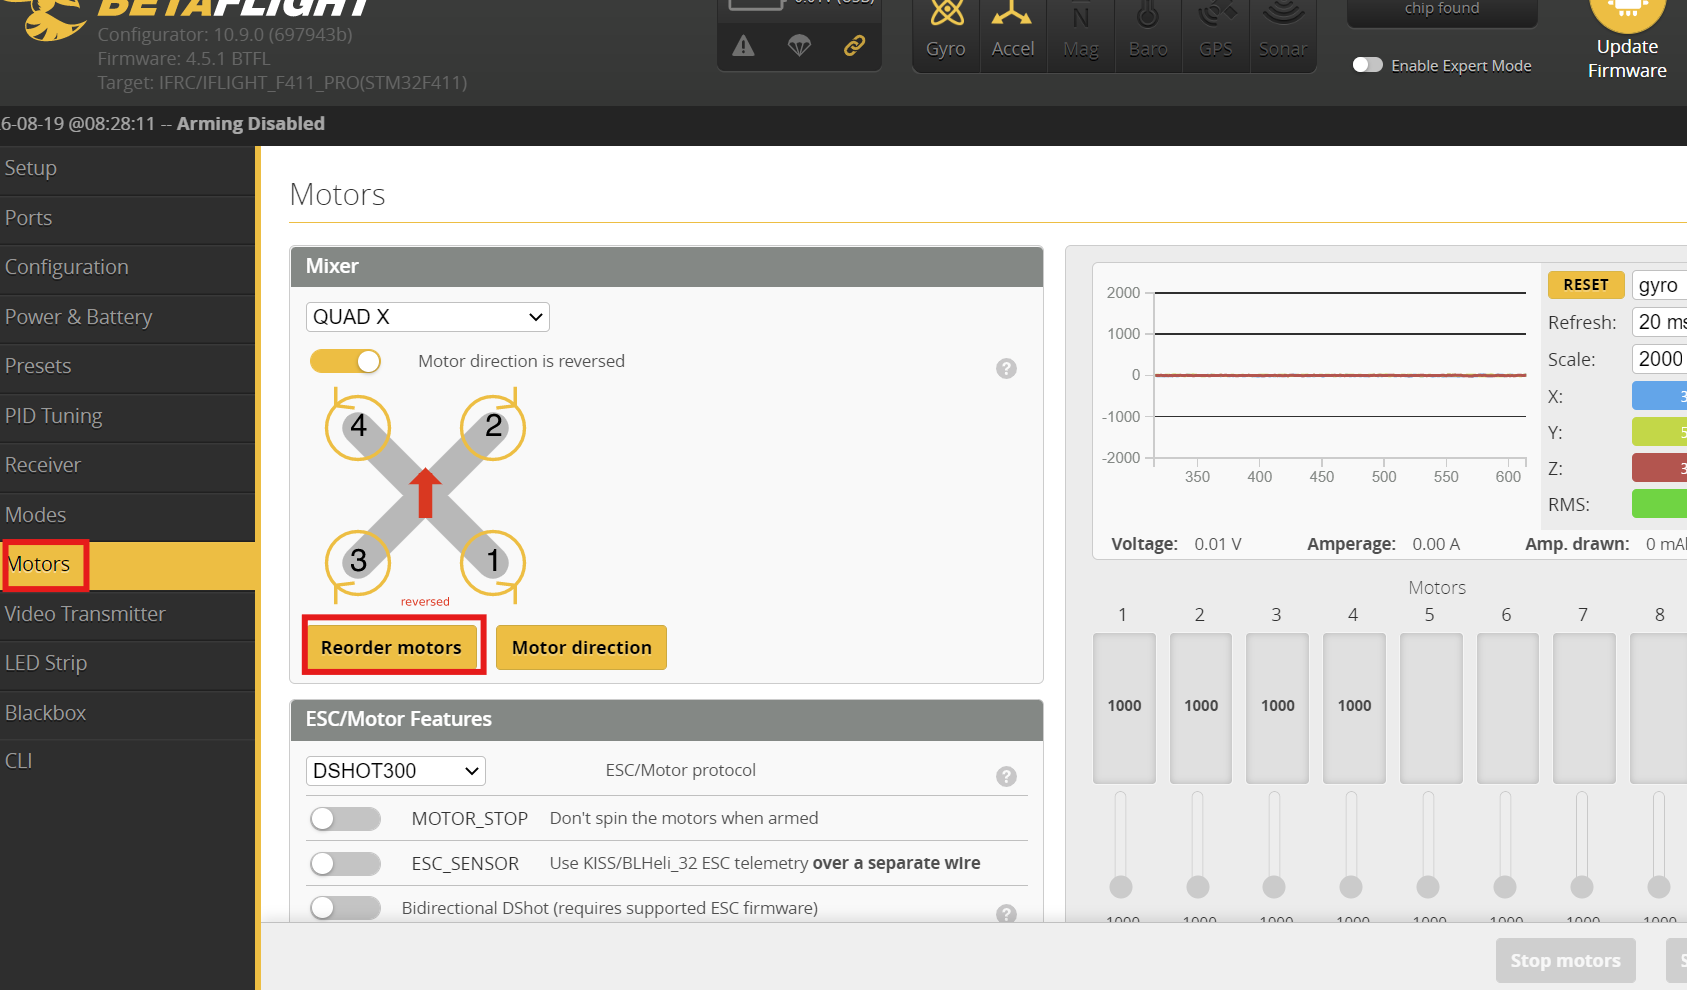
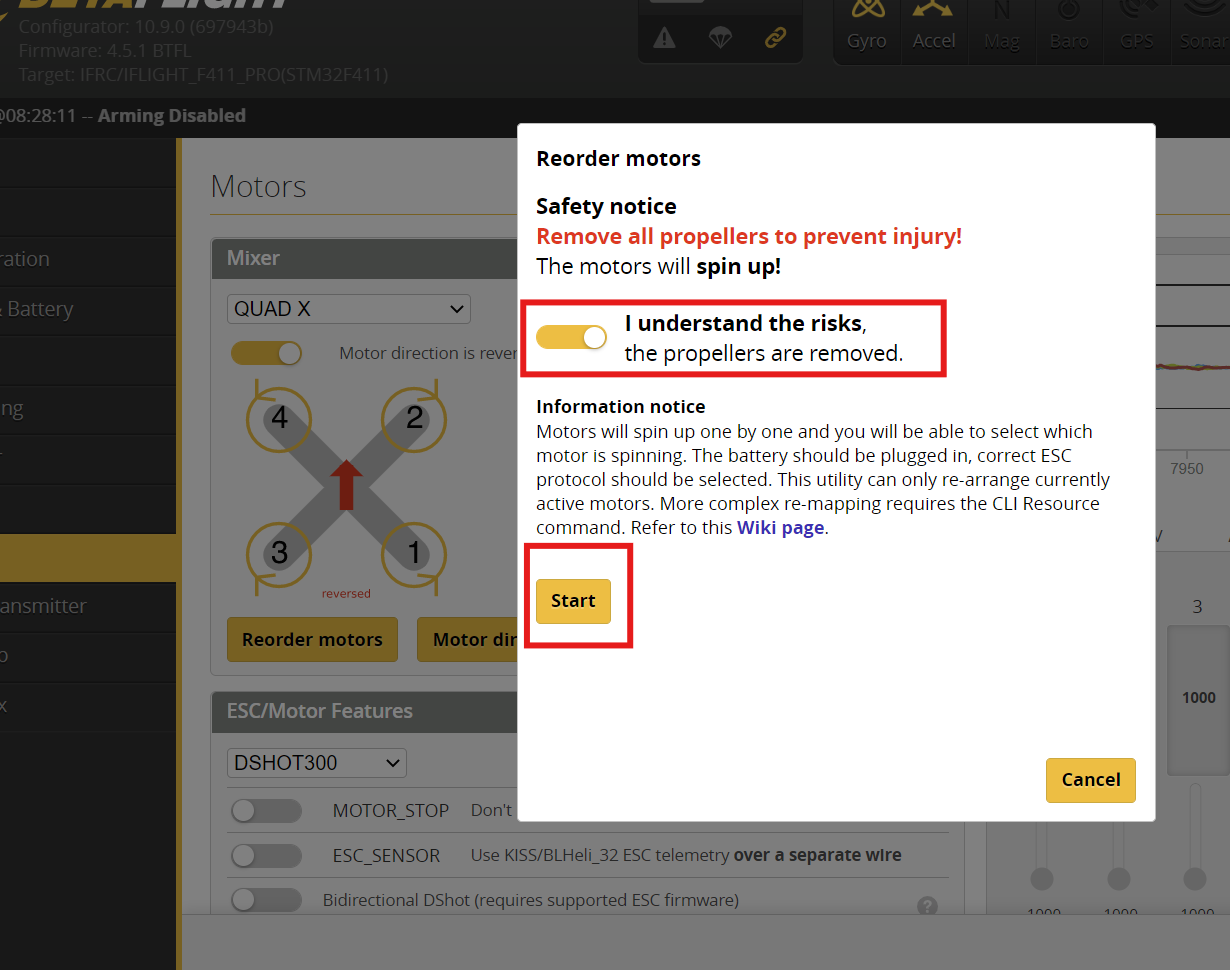
5. With the front of the drone facing the screen, Select "Re-Order Motors"
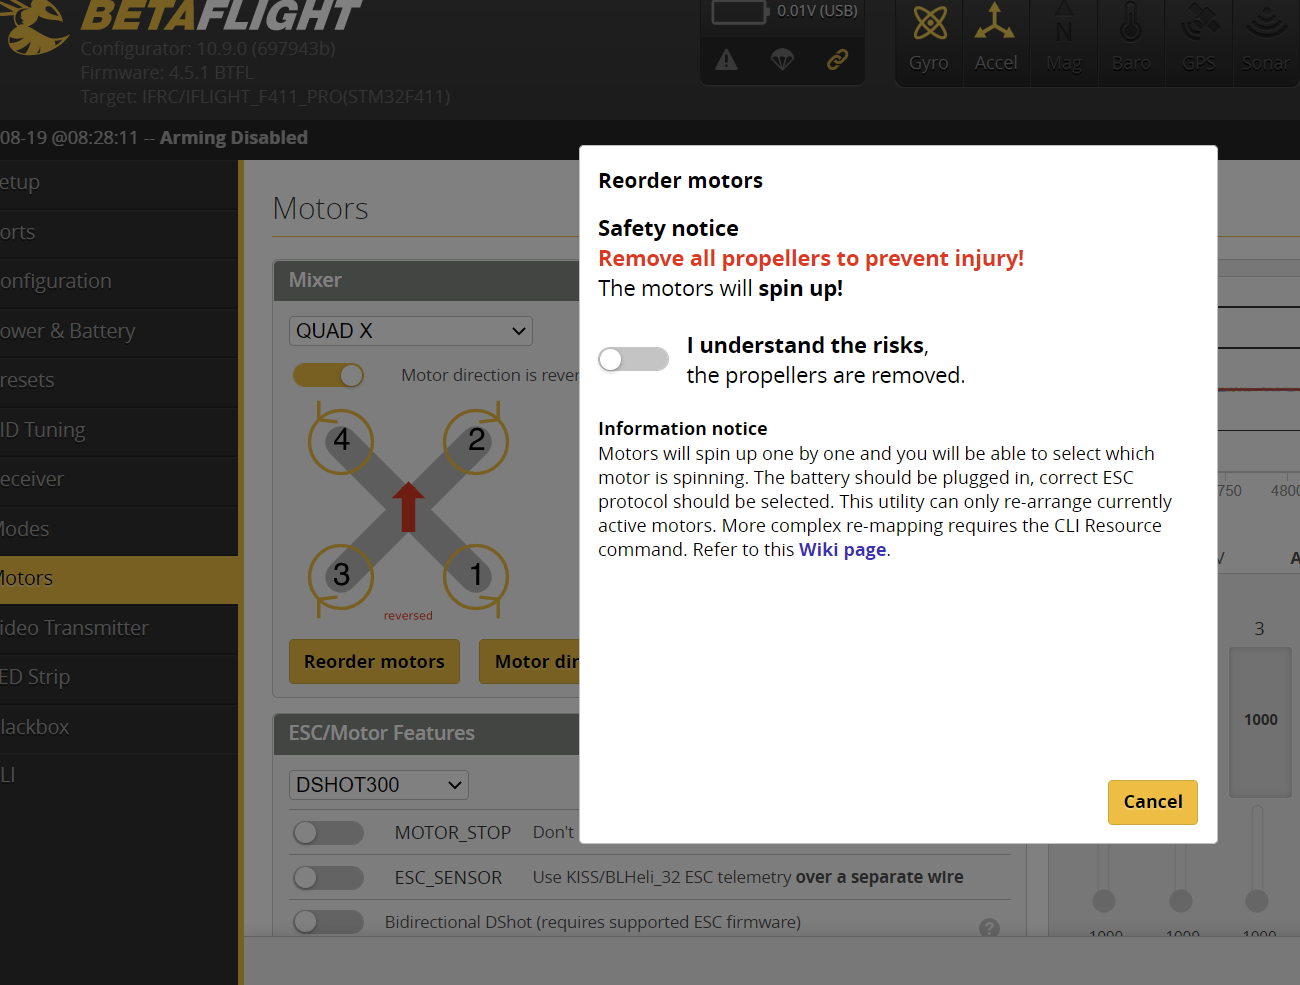
6. Confirm Propellers are removed and fingers are outside the exoskeleton then select "I understand the risks." and select "Start". One of the motors will begin slowly spinning.
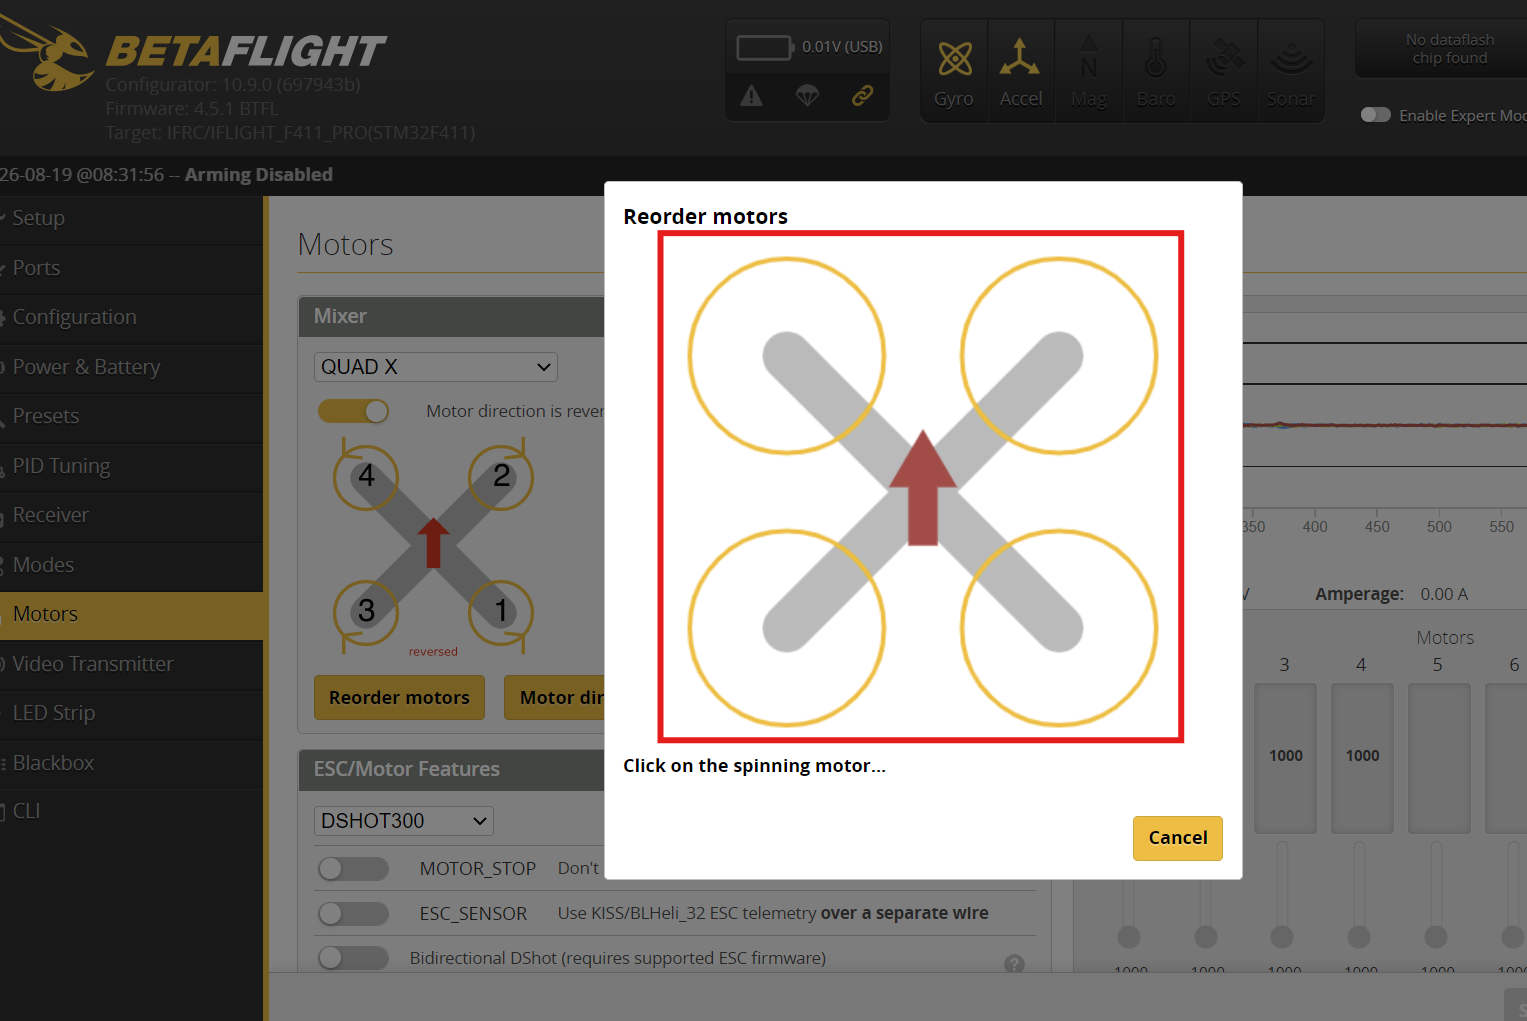
7. This will bring you to this screen. Simply click on the circle associated with the spinning motor. Make sure the front of the drone is pointed nearest to the computer screen. As soon as a circle is selected, it will turn green and the next motor will spin. Once all 4 have been selected the test is complete.
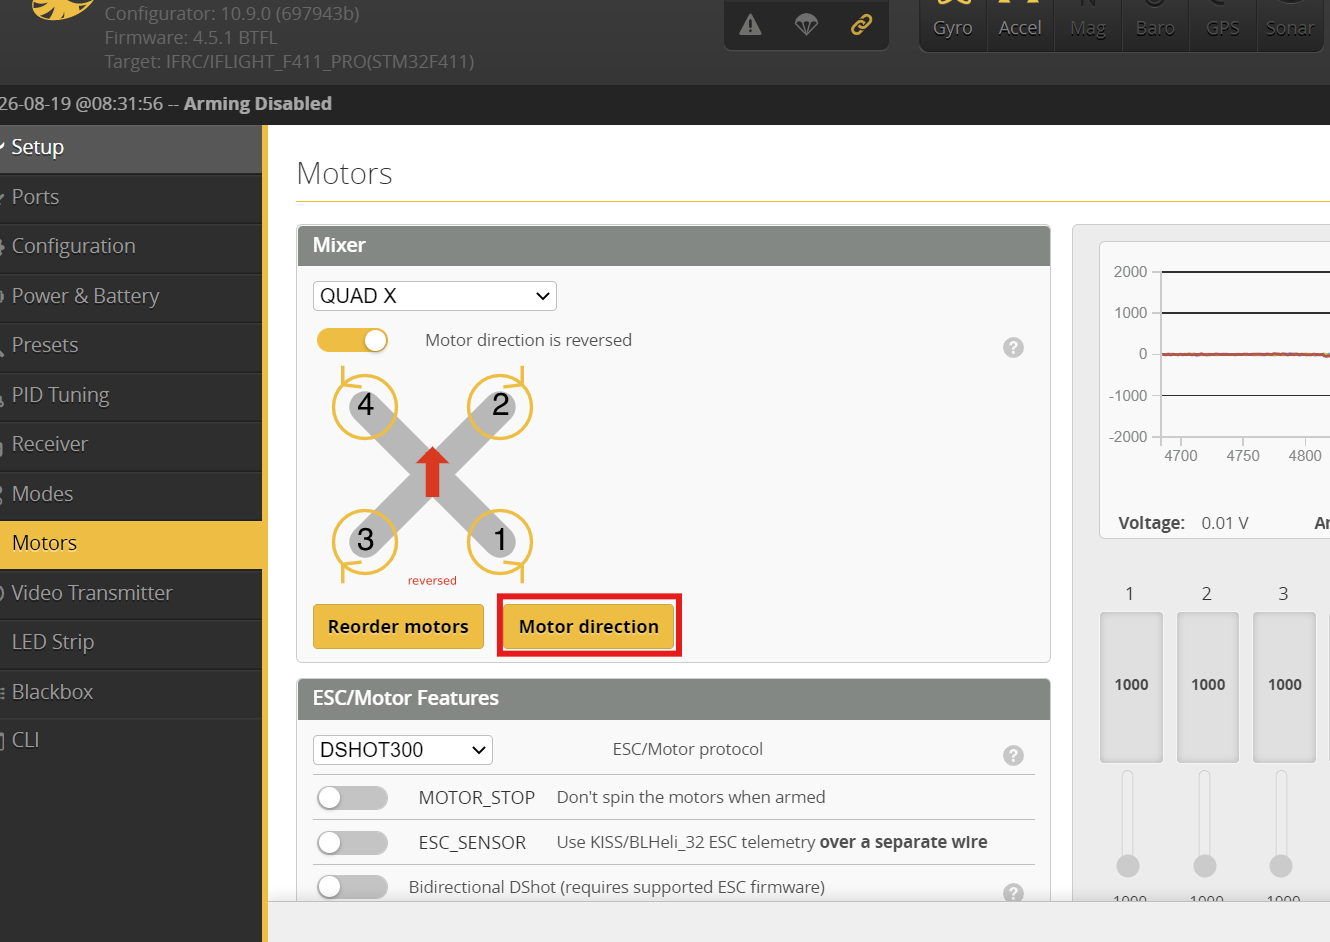
8. Re-ordering sets the baseline of where the motors are located according to the Flight Controller. Next we will make sure each one is spinning the right direction. In the "Motors" tab, now select "Motor Direction". Ensure propellers are removed and fingers are clear before acknowledge the warning.
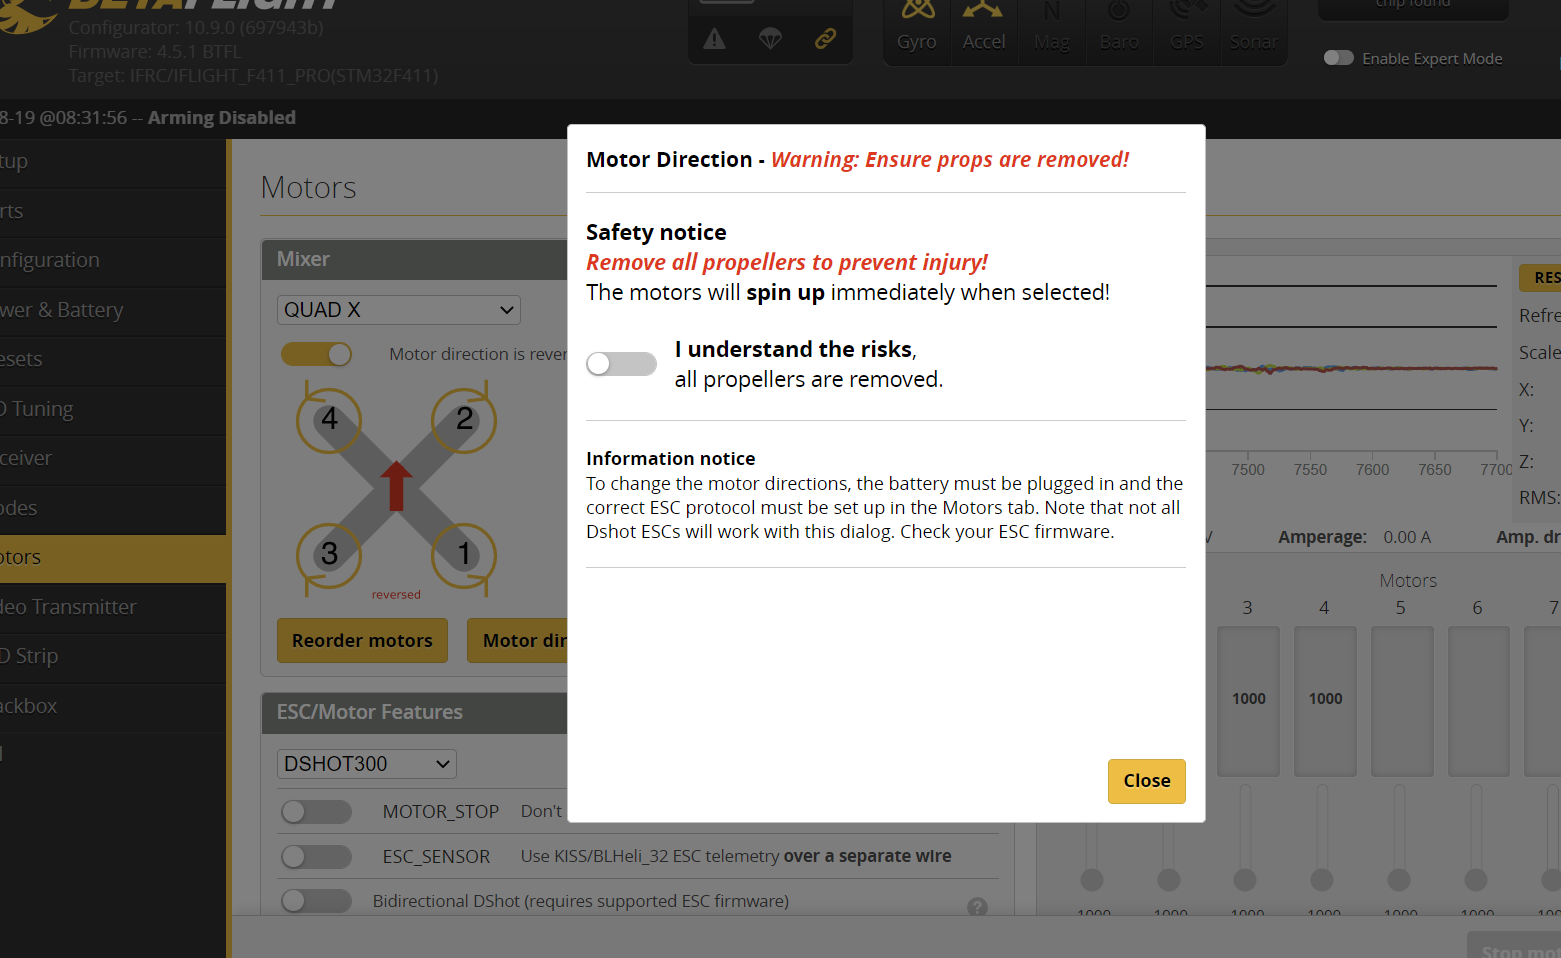
9. A new box will appear once "I understand the Risks" is selected. Pick the "Individually" box. This is telling Betaflight to test 1 motor at a time versus all of them at the same time (Wizard).
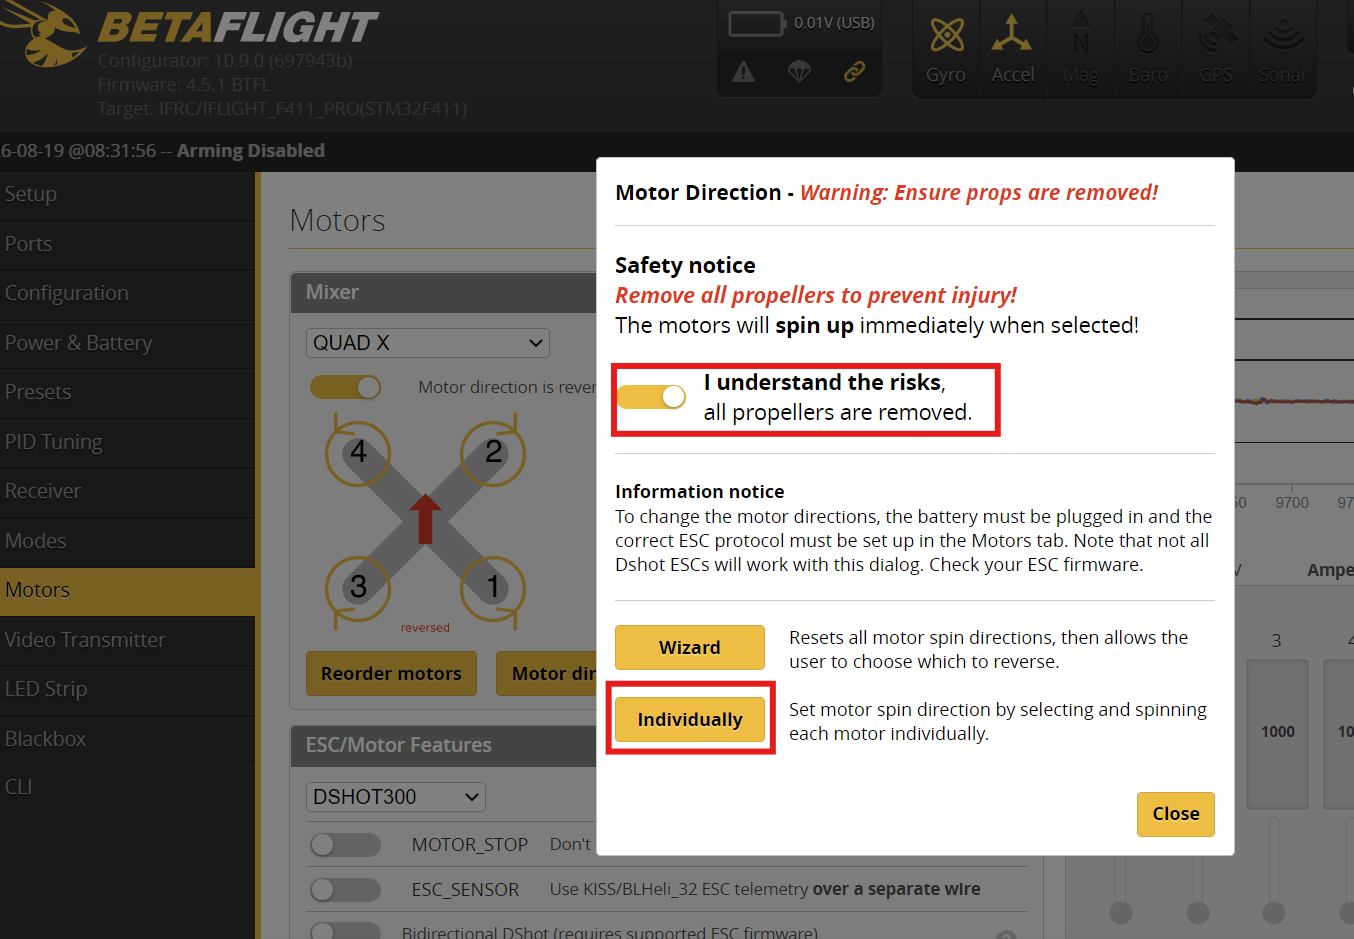
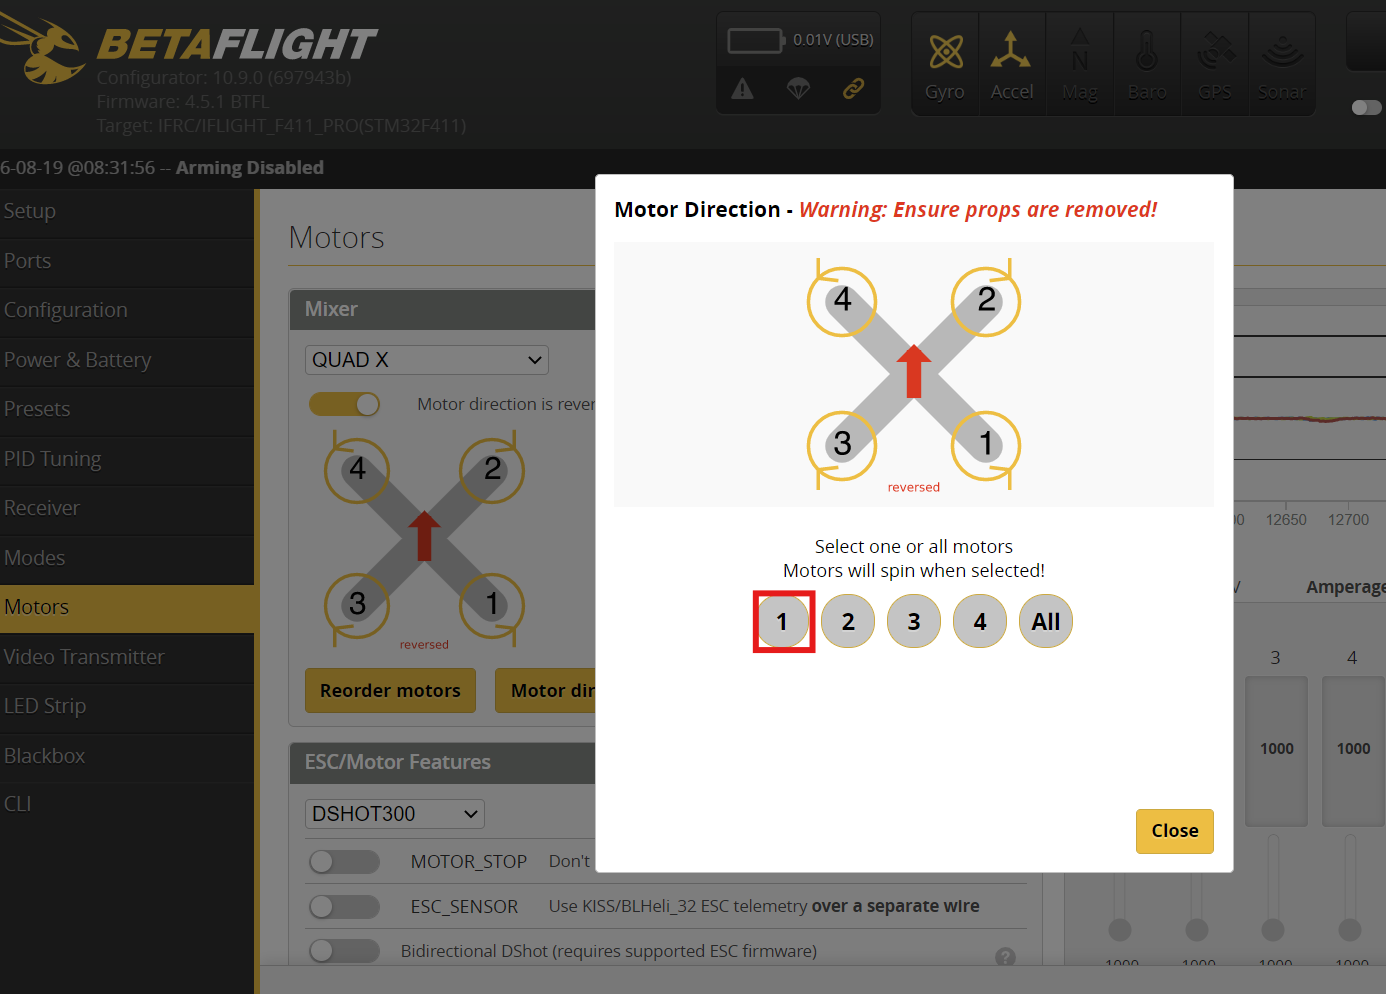
10. A new screen will pop up and this is where the test begins. Select the first motor and watch it spin. If it spins the same direction as the diagram there is nothing to be done. Move on to the next motor number. It may take several clicks to see the direction of rotation.
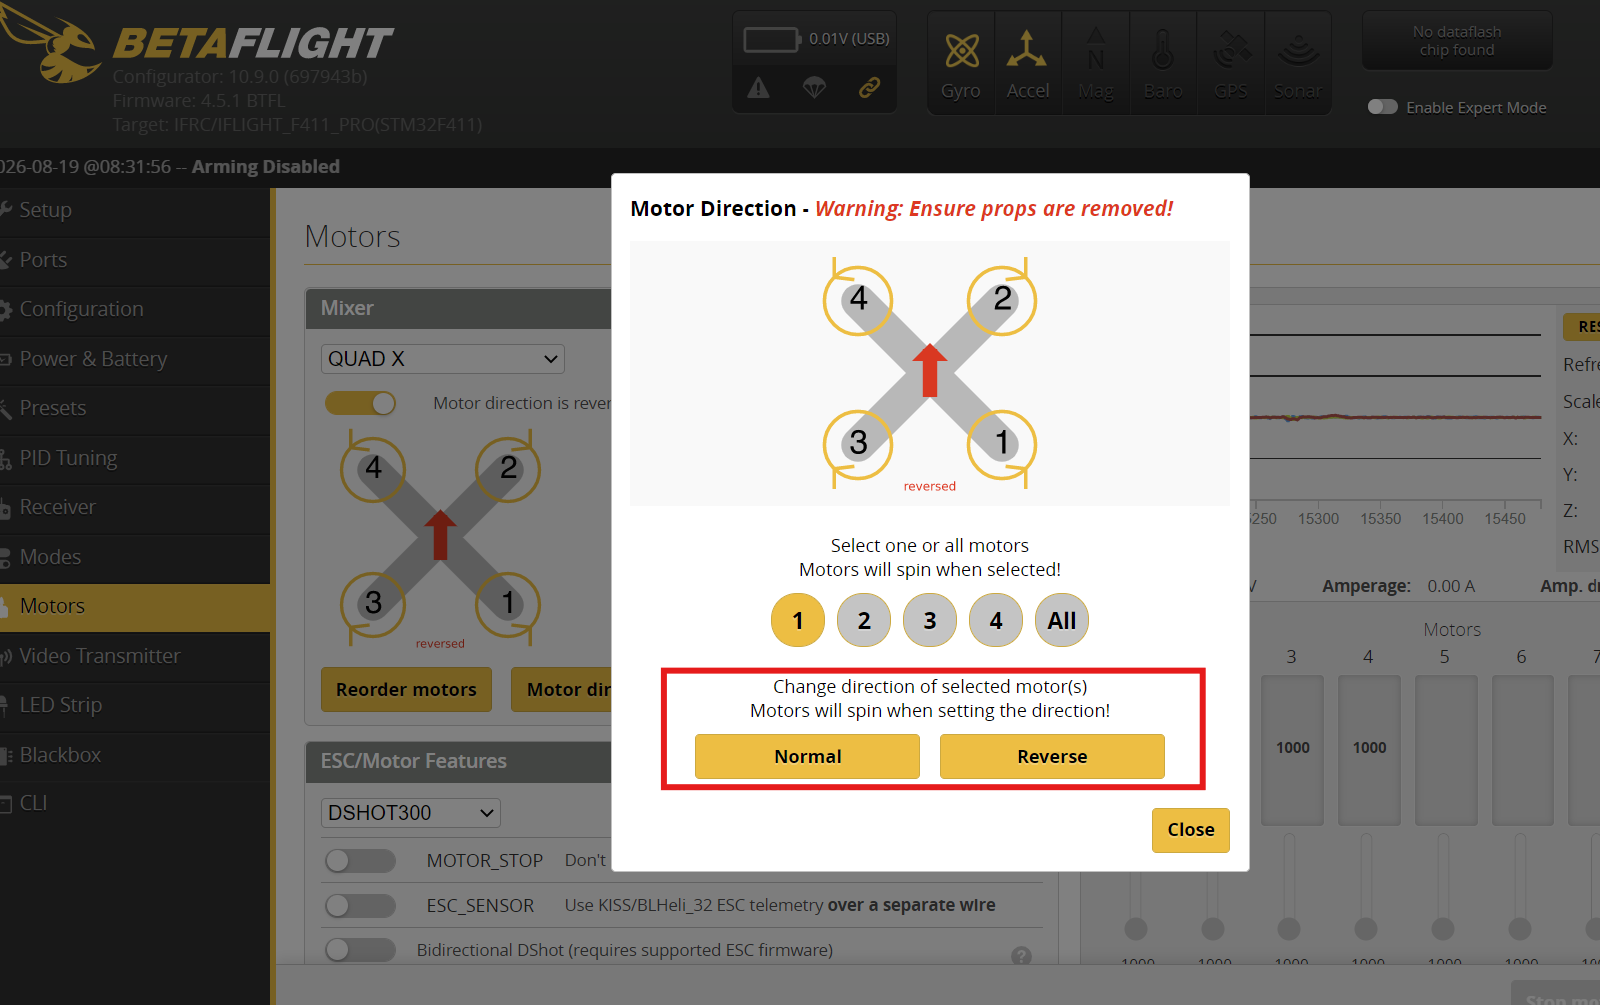
11. If you find a motor spinning in the wrong direction and need it to switch.
*Technique: Use the Slo-Mo camera setting on your phone to detect the rotation direction.
Select "Normal" or "Reverse" then select the number again to test the motor. If after one test it spins in the right direction, stop, move on. Do not keep clicking the test.
Go through each motor to ensure they spin in the right direction and then disconnect the drone and do a test flight. In 99 percent of cases the above will resolve all issues. However, its possible there is a hardware problem and something needs to be replaced. Please call us if your problem persists: 720-466-8586 or email Keson at keson@dronesports.us
We are here for you and are happy to run through this with you or look into alternate troubleshooting methods.
Extra Definitions and Details
- Why direction matters aerodynamically: the two CW and two CCW props cancel net yaw torque; yaw control comes from deliberately unbalancing that torque (speed up the CW pair, slow the CCW pair, or vice versa). A reversed prop breaks torque cancellation instantly, and a backward-pitched prop loses most of its designed thrust.
- Blade-pitch rule (most reliable to determine spin direction): Hold the prop flat, text facing you, tips away. If the leading (higher) edge is on the right, it is a CW prop; if on the left, it is CCW. The leading edge always "leads into" the direction of spin.
- Top/bottom orientation: the glossy/lettered side faces the sky; the matte/textured side faces down.
Symptoms of Incorrect Propeller installation
- One prop on the wrong-rotation position / one motor reversed: the quad flips or death rolls violently and immediately on arming/throttle-up; the PID loop fights itself ("If a CW prop is on a CCW motor … the drone flips immediately"). A single wrong motor "produce[s] a yaw roll instead of stable lift." My Drone Authority
- Prop upside down (correct rotation, inverted pitch): produces downward or greatly reduced thrust. The drone struggles to lift, feels weak, or slams down on throttle up ("inverted props will make the quad slam into the ground the moment you throttle up"). Spinning a prop backward loses roughly 40–60% of designed thrust. My Drone Authority
- Two props swapped (e.g., M1/M2): yaw torque balance is broken — the aircraft spins/yaws uncontrollably on the ground or on takeoff.
- Refuses to lift / drifts: a damaged or mismatched prop makes one motor work far harder, causing unstable hover, drift, or failure to lift cleanly.
- Classroom safety: an incorrectly-propped drone can flip and travel at high speed on arming. Per U19/U.S. Drone Soccer rules, verbatim: "Players and referees should wear glasses or protective eyewear when in the vicinity of the arena during active gameplay." This goes the same for a new untested drone. Always take precautions.