
What rates actually are (in plain-language)
Every time a pilot moves a stick, Betaflight converts that movement into a target rotation speed in degrees per second. Betaflight's official Rate Calculator page states it plainly: "A rate model is the mathematics used to transform the stick position to a turn rate in deg/s." The shape of that conversion is what "rates" control. Three settings define the curve in Betaflight.
- RC Rate: the "volume knob." It scales the whole response up or down and sets the top end rotation speed. Higher RC Rate = the drone rotates faster for the same stick movement. Both GetFPV and Oscar Liang use the same analogy: it works "like mouse sensitivity" — as Oscar Liang puts it, "If you're familiar with computers, you can think of it as mouse sensitivity… The greater the number is the faster the quadcopter will react and spin."
- Super Rate (a.k.a. Rate / "sRate") the "kick at the end.": Near center it does almost nothing, but as the stick approaches full deflection it adds extra speed, making the last portion of stick travel much more aggressive. It lets you have a calm middle and an explosive outer edge.
- Expo: The "soft center." Expo flattens the curve around center stick so small movements produce gentler response, which makes fine aiming easier. Crucially, Expo does not change the maximum speed at full stick. It only changes the feel near the middle. Oscar Liang describes the curve shape this way: "Visualize Expo as transforming the 'V' shape into a 'U', with a higher expo percentage flattening the 'U' around the middle."
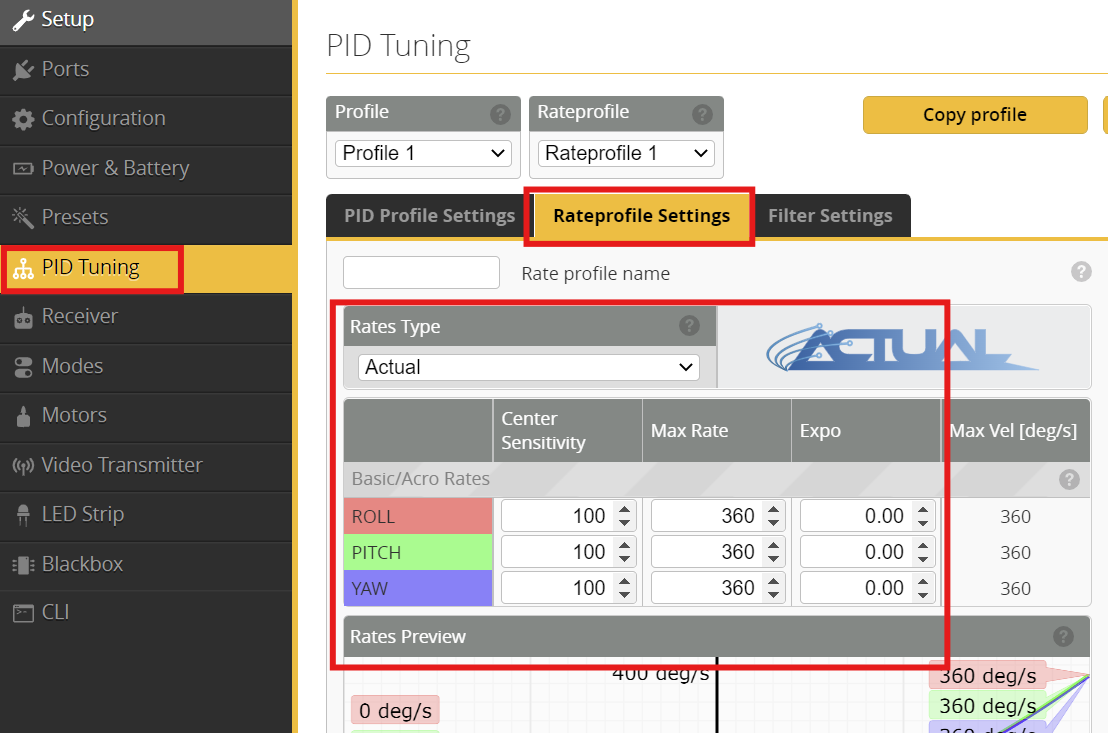
Betaflight defaults to the Actual Rates model. Per Betaflight's official Rate Calculator wiki: "'Actual' rates, by @ctzsnooze, were introduced in 4.2 and became Betaflight's default in 4.3… the center sensitivity and maximum rate can be directly entered in deg/s. The expo setting shifts the kink point of the curve, without affecting center or max rates." Most guides, including Oscar Liang's, recommend Actual Rates for beginners because the three numbers are independent and intuitive: you directly enter Center Sensitivity (deg/s near center), Max Rate (deg/s at full stick), and Expo (curve shape). The older "Betaflight" rates model uses RC Rate / Super Rate / Expo, which interact in confusing ways.
A useful analogy for coaches: rates are the demand side (what the pilot is asking for); PIDs from Part 1 are the delivery side (how well the drone executes it). Don't confuse the two, a twitchy drone might be over rated, not badly PID-tuned.
How rates differ in Angle mode vs Acro mode
This is the single most important concept for a drone soccer coach, because the Saker and other F9A-B balls fly in Angle mode (self-leveling, with a tilt cap).
- Acro mode (a.k.a. rate/manual mode): Every axis (roll, pitch, yaw) is rate controlled. Stick position commands a rotation speed; release the stick and the drone holds whatever attitude it's in. This is what all the classic rate guides are written for.
- Angle mode: Roll and pitch stick position commands a tilt angle, not a rotation speed. Push roll halfway and the drone tilts to roughly half of the angle_limit; center the stick and it self-levels. The maximum tilt is set by angle_limit, not by your RC Rate or Super Rate.
Oscar Liang states this bluntly: "Actually, your drone doesn't use Pitch and Roll Rates in Angle mode (but it uses Yaw Rates), so it doesn't matter what you set them to… If you want to adjust pitch and roll rate, you can adjust Angle Strength and Angle Limit (lower = slower rate)."
Why yaw is different. Betaflight's developers are explicit. In the official pull request that added self-level expo (PR #10516), the maintainer wrote: "Yaw is excluded because this axis uses normal rates and expo controlling the rotational rate around the yaw axis and not an angle setpoint." In other words, yaw never gets capped by angle_limit — there is no "level" for spinning in place — so yaw keeps using the ordinary rate curve (RC Rate / Super Rate / Expo, or Actual Rates' Center Sensitivity / Max Rate / Expo) in both Angle and Acro mode. GitHub
Can you still soften pitch/roll near center in Angle mode? Yes. Historically, Angle mode pitch/roll had no expo, so it felt "jumpy" near center and pilots resorted to adding expo in their radios. Betaflight added dedicated self-level expo (roll_level_expo / pitch_level_expo) in firmware 4.3. As of 4.5, this was reworked: the Angle-mode pitch/roll feel near center is now derived from your normal Rates-tab Expo curve, while — as the official 4.5 development notes state — "in Angle mode, the sensitivity at full stick position is set by the users angle_limit value. The 'expo' functionality in Rates 'flattens out' that sensitivity in the middle." So the ceiling stays fixed by angle_limit, but you can make small, precise positioning movements gentler by adding Expo. For a coach, the practical takeaway: if young pilots are over-correcting and wobbling while trying to hover precisely in front of a goal, a modest Expo increase can calm the center without reducing the maximum tilt they need for speed.
What the U19 Saker actually ships with
The big lesson for coaches: the Saker doesn't expect you to invent a tune. It ships locked down (15° tilt, 70% throttle, gentle rates) and progresses students through preset profiles, which is exactly what Part 2 covered for tilt/throttle caps. Because yaw rate is set equal to roll/pitch in the stock config but is the only one of the three that actually changes spin behavior, deliberately nudging yaw rate is one of the few high-value, low-risk rate tweaks a coach can make.
Yaw rate for drone soccer: starting points and feel
Yaw rate controls spin speed; how fast the ball pivots to change which way its "nose" (and striker flag/LED) points. In a 3-minute, full contact set inside a 10' × 20' cage (F9A-B/20 cm), pilots must constantly reorient to aim a striker run, track the goal hoop, or whip around after a collision.
Because youth drone soccer is flown line-of-sight at very close range, a moderate yaw rate is usually best:
- Too fast: the ball over-rotates past the heading the pilot wanted, feels twitchy, and makes precise aiming at the goal hoop hard, the pilot constantly corrects back and forth. General FPV guidance warns that copying a pro's high yaw rate can make the drone spin so fast a beginner can't track orientation, leading to repeated crashes.
- Too slow: the ball is sluggish to reorient; in a scrum the pilot can't turn fast enough to face a new threat or line up a shot before a defender arrives.
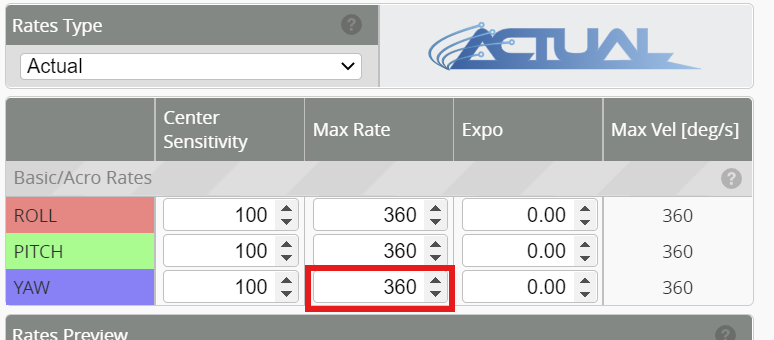
Recommended beginner approach: start from the stock profile value and adjust yaw only, in small steps. Because the Saker's training profile sets all axes equal (modest values), a coach can raise just yaw Max Rate slightly if pilots complain they can't turn fast enough, or lower it if newer pilots keep over-spinning. Change one step, fly a set or two, and re-evaluate. GetFPV's "Tuning Rates" guidance notes that surprisingly low rates work well: "Although initially counterintuitive, the rates that racers normally use are much lower than those of freestyle pilots… For the most part, racers fly with a maximum rate of 300-700 degrees per second on all axes." (For reference, fast racer Evan "headsupfpv" Turner flies 0.8/0.7/0.0, which equals only ~533 deg/s max.) That 300–700 deg/s band is a sensible ceiling for youth drone soccer, where precise aim beats raw spin speed.
Throttle feel: smoother altitude control for contact play
This is distinct from the throttle limit/cap in Part 2 (which lowers maximum power). Throttle feel reshapes how the stick maps to power so the most-used range is easier to control:
- Throttle Mid tells Betaflight where on the stick your hover/cruise point sits.
- Throttle Expo flattens the curve around that point, expanding the fine-control zone so small thumb movements near hover produce smaller power changes, without reducing top-end power. Oscar Liang notes full throttle "still gives 100% power — only the curve to get there changes," and recommends that for whoop-class drones and beginners you can go as high as 0.6–0.8 Expo for "gentler altitude control." Mall Of Aviation
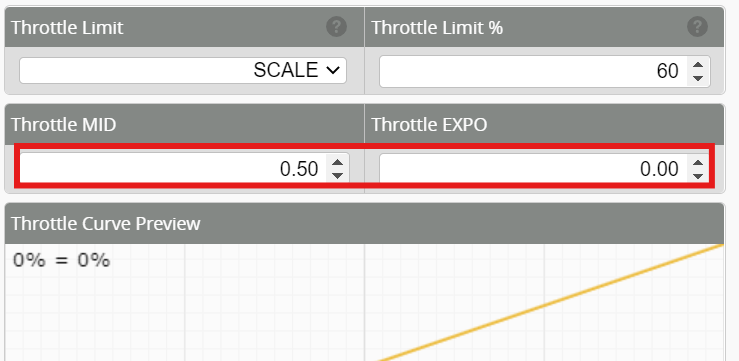
For drone soccer this matters because matches are fought near goal-ring height (3–3.5 m) with constant bumping. A linear throttle (the Saker's thr_expo = 0 default) makes altitude twitchy on a powerful little ball. A practical starting recipe from Oscar Liang's throttle-curve guide: "Lower your Throttle Mid value to where your quad hovers at… then enter 0.2, or 0.25. Increase the Throttle Expo value. Start with around 0.4 and adjust to your preference." This gives pilots steadier altitude hold and softer "punch" control, so a defender bump doesn't send the ball rocketing up or dropping into the floor.
Important caution from the official sources: Oscar Liang notes that adjusting the throttle curve "is not necessary, as it can impact throttle resolution within certain ranges," and that its main legitimate use is "to decrease throttle sensitivity around your quadcopter's hover point." Overly high Throttle Expo can also create a sharp, hard-to-control transition near the hover point — so keep changes modest and test the result. Coaches who want curve control without resolution loss can alternatively set it in the radio (EdgeTX), but should never tune it in both places at once.
A simple, safe beginner workflow (mirrors the Part 1 PID workflow)
- Back up first. Save the existing config (the Saker program provides factory backups). You should always be able to revert.
- Pick the right profile, don't rebuild. For brand-new pilots, stay on the training profile (15° tilt, 70% throttle, gentle rates). Only step up profiles as skills grow (Part 3).
- Change ONE rate parameter at a time, in small increments. Just as with PID tuning, isolate the variable so you can tell what each change did.
- Tune yaw rate by feel. If pilots can't reorient fast enough in scrums, nudge yaw Max Rate up a small step. If they overshoot headings and aim poorly, nudge it down. Fly a set or two between changes.
- Tune throttle feel next. If altitude is twitchy near the goal, add a little Throttle Expo (and set Throttle Mid near the real hover point). Test hovering and gentle climbs/descents.
- Add a touch of pitch/roll Expo only if needed. If precise hovering/positioning wobbles, a small Expo increase softens center without lowering the tilt ceiling.
- Let muscle memory settle. Don't change rates every session. The single most-cited beginner mistake is constant rate-changing, which prevents skill from forming. Fly a set of values for several sessions before judging.
Common beginner rate-tuning mistakes (and fixes)
- Setting rates too high too soon / copying a pro's numbers. A pro's rates are built on years of muscle memory; dropped onto a beginner they feel uncontrollable. Fix: start conservative and raise gradually as skill grows.
- Confusing rates with PIDs. Rates = what you're commanding; PIDs = how the drone executes. A twitchy drone is often a rates problem, not a PID problem. (See Part 1 for PIDs.)
- Wasting effort tuning pitch/roll rates in Angle mode. They barely affect the tilt-limited ceiling — adjust angle_limit and level strength (Part 3) and Expo for center feel instead.
- Ignoring Expo for fine control, or over-using it. A little Expo smooths precise aiming; too much creates a vague, disconnected center. Add it in small steps (≈0.05).
- Changing too many things between flights. Change one parameter, test, repeat — and give muscle memory time to adapt.
- Tuning the throttle curve in both the radio and Betaflight. Pick one place; doing both compounds unpredictably.
Recommendations
Stage 1 — New pilots (first weeks): Leave the Saker on its training profile (15° tilt, 70% throttle scale, stock ACTUAL rates, linear throttle). Don't touch rates yet. Let pilots build basic hover/heading skills. Benchmark to advance: pilots can hold a steady hover and reliably yaw to face a target.
Stage 2 — Developing control: Add modest Throttle Expo (start ~0.2–0.4) with Throttle Mid set near the real hover point, to steady altitude during contact. If pilots can't reorient fast enough, raise yaw Max Rate one small step (keeping the ceiling within roughly the 300–700 deg/s racing band). Benchmark: smoother altitude hold near goal height; pilots can pivot to aim without over-spinning.
Stage 3 — Competitive play: Step up PID/rate profiles per Part 3 (30°→60° tilt, higher throttle). Re-check yaw rate at the new profile — a faster, more powerful ball may need slightly less yaw rate for precise aiming, or more for aggressive blocking. Add small pitch/roll Expo if precise positioning wobbles. Benchmark: pilots win positioning battles and aim striker runs cleanly at full performance.
Triggers to change course: If pilots consistently overshoot headings/altitude → reduce yaw rate or add Expo. If they can't keep up with play → raise yaw rate a step or move up a profile. If a change makes things worse, revert to the backup and change less.