
How the throttle cap actually works
Betaflight offers two different ways to limit power, and they are not the same:
- Throttle Limit (throttle_limit_type + throttle_limit_percent, on the rate profile): scales the throttle stick input before it reaches the mixer. SCALE compresses the whole range proportionally; CLIP lets the stick work normally then flatlines at the cap. This is how Drone Sports does it.
- Motor Output Limit (motor_output_limit, on the PID profile): caps the final motor output after the PID loop, as a hard ceiling regardless of what the controller commands.
On the Saker Bantam, the ~60% cap is implemented as throttle_limit_type = SCALE with throttle_limit_percent = 60 in the training rate profile, while motor_output_limit is left at 100. Crucially, the ball ships with four escalating rate profiles: 60% (training), 80%, 100%, and 100%. So you usually don't need to type anything, you simply select a higher profile.
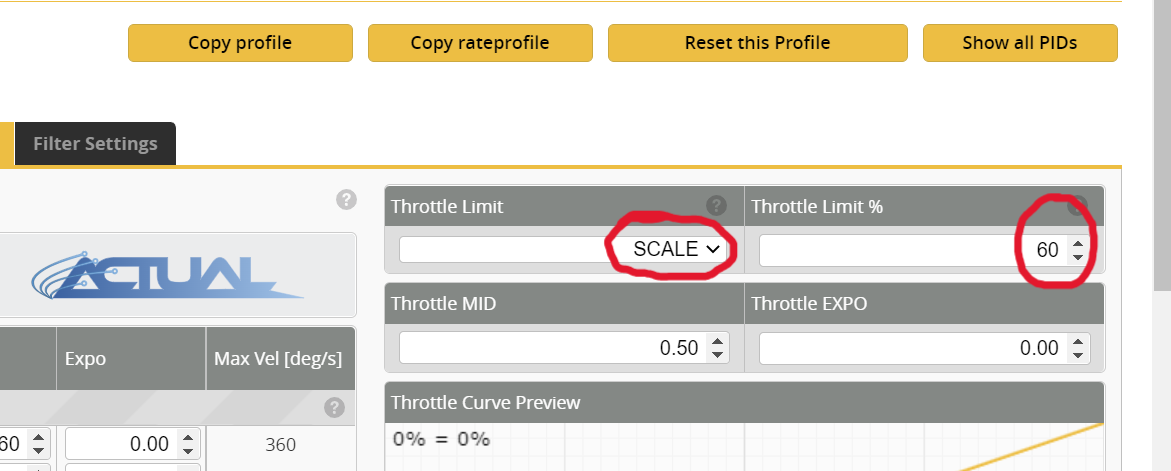
Why SCALE rather than Motor Output Limit matters: throttle scaling reduces how much power your top-stick commands but leaves the PID loop full authority to stabilize so the ball stays well behaved while flying slower. (Lowering Motor Output Limit instead would starve the controller of headroom and make the ball fly worse, not just slower.)
What changes when you raise SCALE, and the risks:
- More current draw → more heat in motors and ESCs, and faster battery drain. Watch for hot components and voltage sag (the pack voltage dropping under load), which risks over-discharging cells below safe limits.
- More thrust → more force in collisions. In a contact sport inside a cage, more power means harder hits on other balls, the cage, and goal rings: a frame/cage durability consideration.
- The PID loop is unaffected by throttle scaling (that's why SCALE is the right choice, the controller still has full authority to stabilize), but the ball will be faster and less forgiving of pilot error.
How the angle (tilt) limit actually works
In Angle mode, stick position commands a tilt angle, and the angle limit sets the maximum tilt the ball will reach no matter how far you push. In current Betaflight this is the angle_limit setting (the successor to the old level_limit), and it lives on the PID profile. Unmanned Tech Shop
On the Saker Bantam, the ~15° cap is angle_limit = 15 in the training PID profile. Like throttle, it escalates across the four built-in PID profiles: 15° (training), 30°, 60°, 60°. Raising it is, again, mostly about selecting a higher profile.
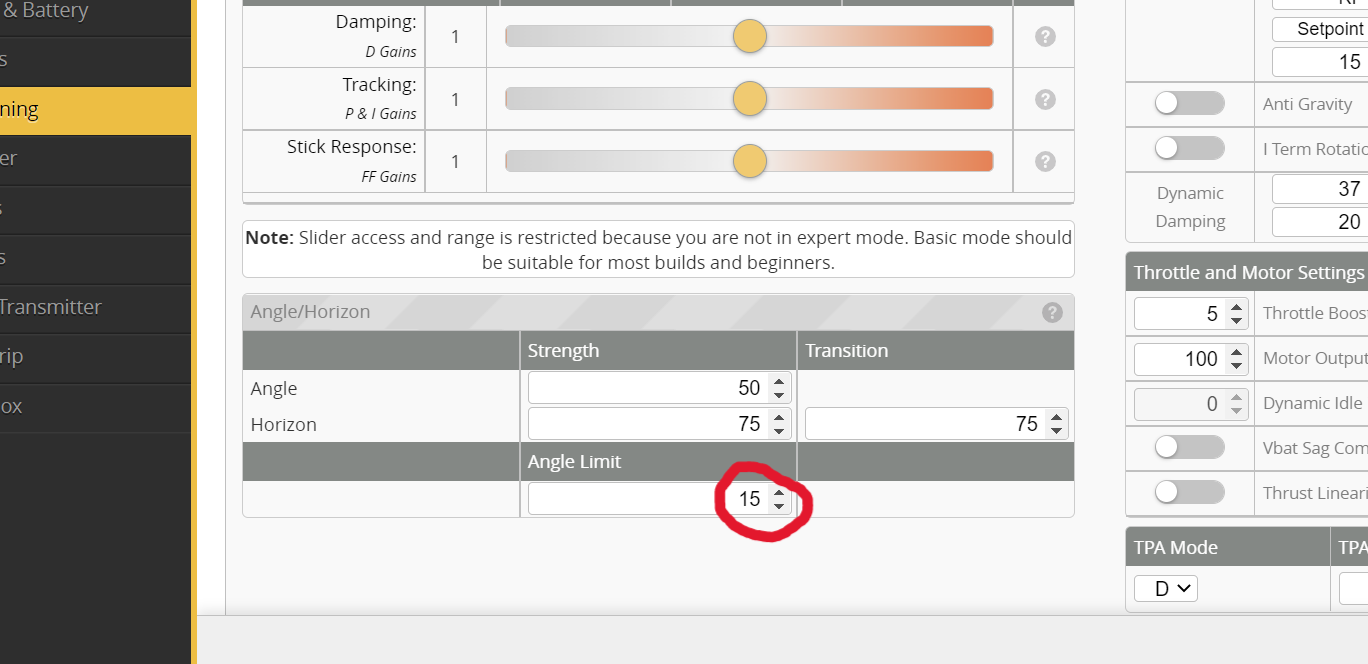
What changes when you raise it from 15°:
- More aggressive maneuverability and faster lateral movement/strafing, better ball control, attacking, and defending. A ball that can tilt 30° accelerates sideways far faster than one capped at 15°.
- Harder to control = more tilt means more speed means more chances to overshoot a target, hit the cage, or collide.
- More disorientation risk for student pilots, and more wall/cage collisions if pilots aren't ready.
- Bigger demand on your tune. A higher tilt limit produces faster approaches and therefore more violent collisions. Without adequate D-term damping and clean filtering, the ball will overshoot and bounce back harder after every hit. This is why you must retune (or step up to the matched higher profile, which is already balanced for it) rather than just raising the number in isolation.
Recommended methodology for raising caps in a youth/education setting
The ball's four profile design is essentially a built-in progression ladder. Use it deliberately:
- Everyone starts on the training profile (15° / 70%). Build basic competence: hovering, holding position, gentle directional flight, controlled landings.
- Always raise caps in a netted/caged practice area, never in open space or a crowded room, and with safety glasses on (included in the classroom kits).
- Raise one cap at a time, in small steps. Move from 15° to 30° or 70% to 85% — not both at once — so students adapt to one change at a time. Map profiles to a switch so you (the coach) control when a student "levels up."
- Let students build comfort and skill at each level before progressing. A pilot who still hits the cage at 15° is not ready for 30°.
- Use the matched higher profile rather than hand-editing a single value. The Bantam's higher profiles already pair the bigger angle/throttle with appropriate tuning. If you do hand-edit, retune D-term/filtering to match the bigger commanded angles.
Monitor for "you've outrun your tune" symptoms at each new level:
- Overshoot of targets / the ball sailing past where the student aimed.
- Bounce-back or rocking after collisions (needs more D / better damping).
- Hot motors or ESCs after a set (back off, check filtering and lower if needed. Adjusting these setting too high can destroy equipment and will not be warrantied).
- Voltage sag or short flight times (battery can't keep up = reduce throttle cap or check pack health). If you see these, drop back to the previous profile until the tune (or the pilot) catches up.
Why Drone Soccer tuning is different
Drone Soccer tuning priorities differ from freestyle/racing quads in important ways:
- Durability and bounce back recovery after collisions matter far more than raw speed or "feel." A soccer ball spends its life bumping the cage, the goal, and other balls.
- Angle mode with a tilt cap is the norm (for control and safety), so the angle limit and angle strength are your main handling levers, not acro rates a freestyle pilot obsesses over.
- Crash/collision behavior is central. Betaflight's Crash Recovery feature (CLI-only; auto-levels the craft after a detected impact) and I-term relax (reduces bounce-back at the end of fast moves) are the kinds of settings worth understanding for a contact sport though for most coaches, trusting the Saker preset's already-balanced profiles is the safest path. Yarosfpv
Recommendations
Stage 1 — Learn the system before changing anything.
- Back up each ball's config before touching settings. Read the P/I/D and rates sections above so you can interpret what students report ("it wobbles," "it's sluggish," "it bounces after a hit").
- Keep all balls on the training profile (15° / 60%) for early sessions.
Stage 2 — Progress with the built-in profiles, on a switch.
- Map the rate/PID profiles to a switch so you can step students from 15°→30° tilt and 70%→85% throttle when they demonstrate control. Change one cap at a time.
- Benchmark to advance a pilot: clean hovering and controlled directional flight.
Stage 3 — Only hand tune if a real problem appears. Note that damage can occur and will not be covered by warranty.
- If you see fast shimmer/buzz/hot motors → reduce P (or D). If you see slow wobble/bounce after hits → check D (raise it for clean damping) and I (lower if it's a slow post-collision rock). If it drifts → raise I. If mushy → raise P. Always one step, one test flight, check motor temps.
- Leave filters alone unless motors run hot with no oscillation.
Stage 4 — Keep it legal and safe for competition.
- Verify the fail-safe cuts motors and props are undamaged and non-metal before every event.
Thresholds that should change your plan:
- Motors too hot to hold comfortably → back off D/throttle immediately.
- Persistent bounce-back after collisions at a new profile → drop to the previous profile; the tune has been outrun.
- Voltage sag / flight times dropping sharply → reduce throttle cap and inspect battery health.
Tuning these is the path for higher level competition. Each pilot can find the performance to match their skill and team strategy. However tuning is not required and you can always reset to factory settings by re-flashing the CLI code offered in the Professional Development.